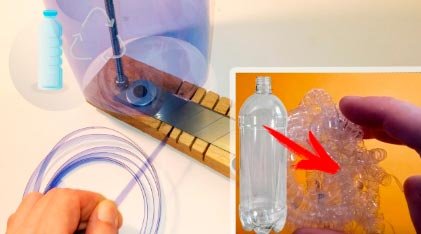
A plastic bottle isn’t trash-it’s free, highly durable raw material ready for transformation. With minimal investment of time, one can transform these PET into a structural element exhibiting remarkable wear resistance. We present a method for fabricating a lightweight, anti-corrosive meshing suitable for horticultural zoning or poultry habitat construction.
The final outcome is a sturdy, woven architecture that visually mimics metallic screening, yet boasts the key advantages of rust immunity and significantly lower specific weight. This self-manufactured enclosure is conclusive proof of secondary material longevity.
Materials You’ll Need
Materials You’ll Need
You don’t need expensive tools – just some patience and creativity. Prepare the following:
- PET plastic bottles (preferably the same size – 1.5 L or 2 L bottles work best)
- Plastic bottle cutting tool – watch the tutorial: Plastic Bottles Cutter – Simple How to Make
- Hair dryer or heat gun for softening the plastic
- Pencil or marker for marking lines
- Flat wooden or metal board to guide straight cuts
- Weaving template (jig) – can be made from a wooden plank and nails or metal hooks
It is also highly beneficial to review the guide: “Optimal Strand Production: Utilizing the Bottle Tape Twisting Apparatus.“ This supplemental viewing demonstrates the critical twisting procedure essential for transforming cut plastic ribbon into robust, pliable filament suitable for weaving.
Step-by-Step Instructions
1. Prepare the Bottles
Wash each bottle thoroughly, remove the labels, and let them dry. Clean bottles make smoother cuts and higher-quality strips.
2. Cut and Twist the Plastic Strips
Mount the bottle into the bottle-cutting tool and rotate it slowly. This will produce a continuous ribbon of plastic.
The width (about 3–8 mm) will determine the strength of the final mesh.
Next, twist each strip using hot air from a hair dryer or heat gun. Warm the strip gently while turning it around its axis – or use a simple twisting tool as in the video.
As the plastic heats up, it slightly contracts and becomes springy, flexible, and several times stronger, resembling a fine nylon or wire cord. Allow the strips to cool while stretched – they’ll remain straight and tough.
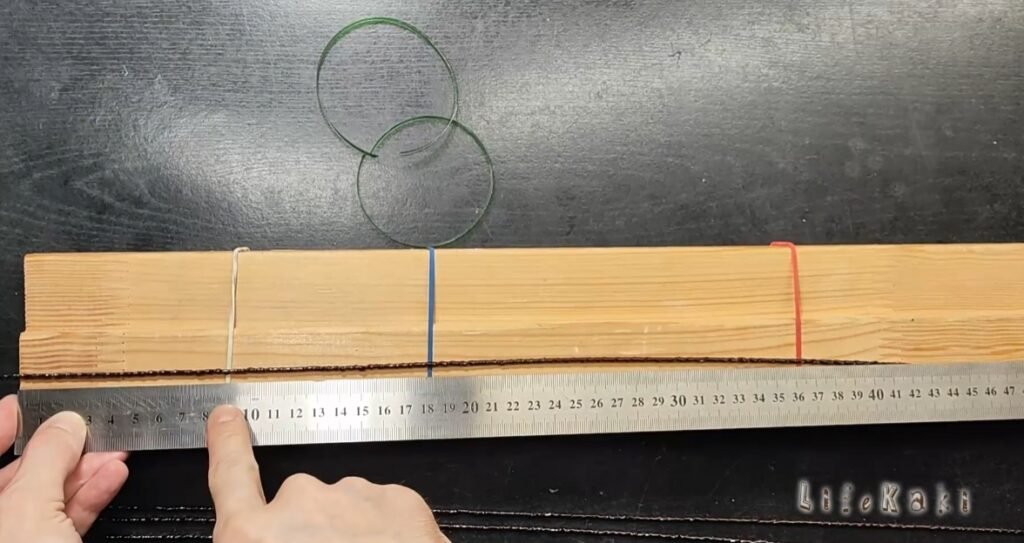
3. Straighten and Prepare for Weaving
Once cooled, lay the plastic threads flat on a table or hang them to relax. If they appear wavy, reheat and lightly stretch them to even out.
4. Weaving the Net (Rabitz Style with a Homemade Template)
This step determines the quality of your final net. You’ll need a simple weaving jig to guide the pattern.
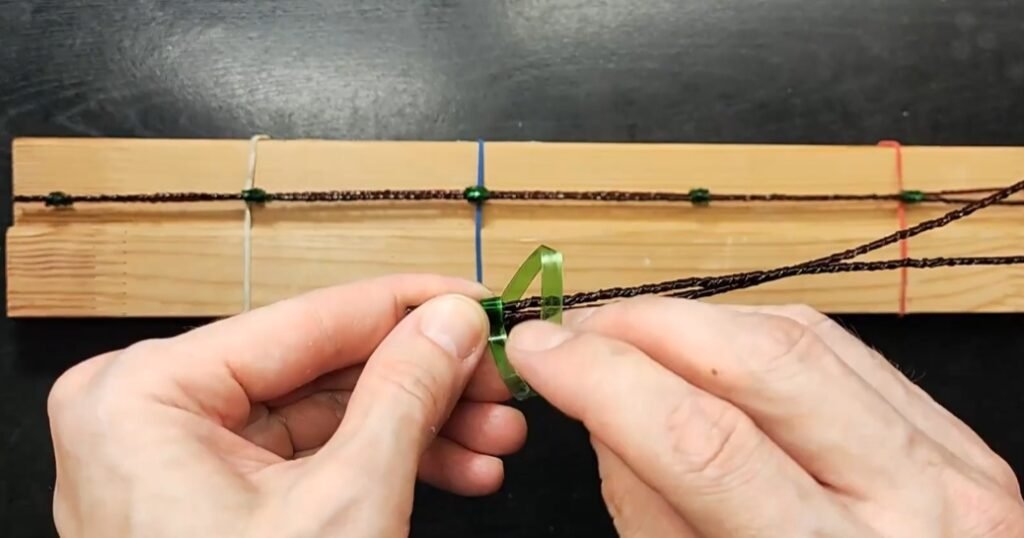
Take a wooden board and hammer nails or hooks along its edges in a staggered pattern, forming a zigzag layout – this helps you maintain equal spacing and the correct angle of weaving.
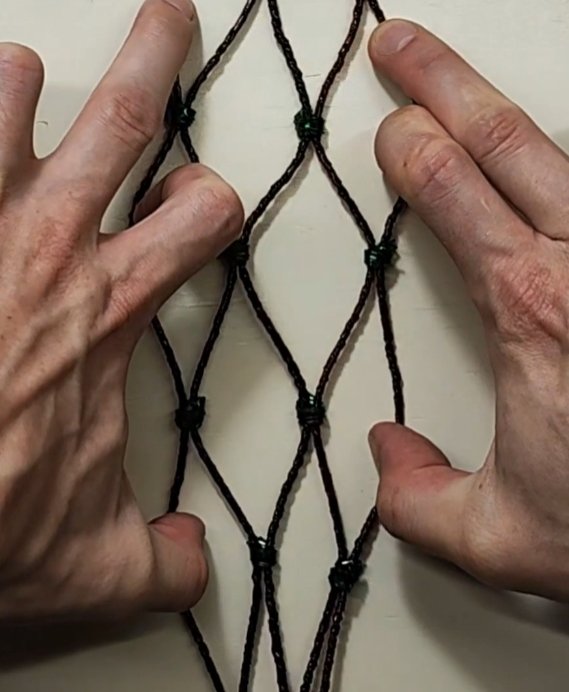
Start by laying one twisted strip diagonally across the jig, then weave the next one in the opposite direction, passing alternately over and under the previous strips – exactly as chain-link fencing (rabitz) is made.
Once you finish one section, carefully remove it from the template. The woven pattern will hold its shape thanks to the tension in the twisted plastic.
For superior durability, fortify the connection points. Introduce localized low heat (a hairdryer works perfectly) to gently fuse the adjacent plastic edges, or simply use tight self-securing plastic tie-offs to bind the joints.
What you finish with is a highly adaptable, geometrically precise mesh possessing the sturdiness of steel cable but only a fraction of the weight. It’s clean-cut, flexible, and surprisingly robust.
5. Installation and Use
Mount the finished net onto a wooden or metal frame using plastic ties or wire.
It’s suitable for:
- Fencing off garden beds or flower patches
- Creating enclosures for chickens, ducks, or quails
- Supporting climbing plants (beans, peas, cucumbers, grapes)
- Temporary outdoor partitions
Advantages of a Plastic Bottle Net
- Durable and weatherproof: PET plastic doesn’t rust, rot, or absorb water.
- Light and flexible: Easy to move, roll, or install.
- Eco-friendly: Reduces plastic waste and promotes circular use.
- Safe for birds and plants: No sharp edges if ends are smoothed.
- Low-cost: Made entirely from discarded materials.
Practical Tips
- For a denser net, use narrower strips (4–5 mm wide).
- Dark-colored bottles last longer under direct sunlight.
- Avoid open flame – only use warm air to fuse or bend.
- Store unused strips coiled up to prevent cracking.
- Keep your jig solid and evenly spaced for consistent mesh openings.
Maintenance and Safety
Check the net every few weeks – after strong wind or rain, the plastic may stretch slightly. If any part loosens, simply heat and retighten.
Always cut and heat plastic in a well-ventilated space, and wear gloves when handling hot material.
Useful Links
- Plastic Bottles Cutter – Simple How to Make
- How to Twist Tape from Plastic Bottle – Tape Twisting Tool
Related Videos You Might Like:
- Lamp made from glass jar and stones from the sea
- DIY Lamp from a Crystal Flower Vase – Festive Decoration Idea
- How to tie a shoelace with a metal ring
- How to Change the Circle on the Grinder Without a Key – Easy and Safe Methods
- How Clean Can Your Shaver Get With This Trick?
This article is also available in: English | Deutsch | Українська | Français | Español | Português | Chinese
Let’s Hear from You!
Did you know about this method? Drop your experience or questions in the comments! Your feedback helps and inspires others.


Leave a Reply